文章目录
-
- # uname -r 3.10.0-693.el7.x86_64 ; 不同操作系统的内核版本会不一样,最好记住它 # df ; 确认 boot 目录的空间不少于 300 MB 1 2 3
- nouveau 是系统自带的一个显示驱动程序,需要先将其禁用,然后再进行下一步操作,否则在安装显卡驱动时,会提示:You appear to be running an X server …,然后安装失败。分别打开如下两个文件(如果没有就创建一个),并在其中输入如下两句,然后保存。 # vim /etc/modprobe.d/nvidia-installer-disable-nouveau.conf # vim /lib/modprobe.d/nvidia-installer-disable-nouveau.conf ... blacklist nouveau options nouveau modeset=0 1 2 3 4 5 或者直接运行 NVIDIA 显卡驱动安装包(*.run),会出现提示:One or more modprobe configuration files to disable Nouveau have been written … 点击 OK 之后,会自动在指定位置创建好禁用 nouveau 驱动的文件,这样就不需要再手动添加。
- 这一步需要确保 boot 文件目录的空间足够,否则会失败。建议大于 400 MB # cp /boot/initramfs-$(uname -r).img /boot/initramfs-$(uname -r).img.bak # dracut /boot/initramfs-$(uname -r).img $(uname -r) # rm /boot/initramfs-$(uname -r).img.bak ; 这一步可不执行 1 2 3
- 如果之前在图形界面操作,需要改为终端模式,runlevel 改为 3 # systemctl set-default multi-user.target # init 3 # reboot 1 2 3
- 预安装一些必需的组件,需要联网 # yum install gcc kernel-devel kernel-headers 1
- NVIDIA 官网的显卡驱动下载,很方便 执行如下的安装步骤,必需指定 kernel source path,否则会报错;kernel 的版本和系统内核有关,可能会有差别 # cd /to/your/directory/ ; 跳转到驱动所在的目录 # ./NVIDIA-Linux-x86_64-384.81.run --kernel-source-path=/usr/src/kernels/3.10.0-693.5.2.el7.x86_64 -k $(uname -r) 1 2 执行后,开始解压驱动包,进入安装步骤,可能中间会出现一些警告,但是不影响 Verifying archive integrity... OK Uncompressing NVIDIA Accelerated Graphics Driver for Linux-x86_64 384.81....................................... .................................................................. .................................................................. 1 2 3 4 许可证 -accept … 安装 32 位兼容库 -yes 安装速度很快 安装顺利完成
- 执行如下两条语句,如果出现显卡的型号信息,说明驱动已经安装成功。 # lspci |grep NVIDIA 03:00.0 3D controller: NVIDIA Corporation GP104GL [Tesla P4] (rev a1) # nvidia-smi Sun Nov 19 10:49:31 2017 +-----------------------------------------------------------------------------+ | NVIDIA-SMI 384.81 Driver Version: 384.81 | |-------------------------------+----------------------+----------------------+ | GPU Name Persistence-M| Bus-Id Disp.A | Volatile Uncorr. ECC | | Fan Temp Perf Pwr:Usage/Cap| Memory-Usage | GPU-Util Compute M. | |===============================+======================+======================| | 0 Tesla P4 Off | 00000000:03:00.0 Off | 0 | | N/A 37C P0 23W / 75W | 0MiB / 7606MiB | 0% Default | +-------------------------------+----------------------+----------------------+ +-----------------------------------------------------------------------------+ | Processes: GPU Memory | | GPU PID Type Process name Usage | |=============================================================================| | No running processes found | +-----------------------------------------------------------------------------+ 1 2 3 4 5 6 7 8 9 10 11 12 13 14 15 16 17 18 19 20
- 在 NVIDIA 官网下载对应的安装文件,建议选择 *.run 文件,用本地安装的方式 本文使用的是 cuda_9.0.176_384.81_linux.run,接下来进行安装 # ./cuda_9.0.176_384.81_linux.run ... Install NVIDIA Accelerated Graphics Driver ... -no ; 不需要再安装显卡驱动 Install OpenGL ... -no ; 这个组件一定不要安装,如果出现选择,选 No Install CUDA 9.0 Toolkit ... -yes Toolkit location /usr/local/cuda-9.0 ... [Enter] ; 默认安装位置即可 Install a symbolic link at ... -yes Install CUDA 9.0 Samples ... -yes ; 安装一些例程 Enter CUDA Samples Location ... [Enter] ; 默认安装位置 ... Finished Driver : Not Selected Toolkit : Installed in /usr/local/cuda-9.0 Samples : Installed in /root, but missing recommended libraries ***WARNING: Incomplete installation! 1 2 3 4 5 6 7 8 9 10 11 12 13 14 15 出现警告,安装不完全,但是没有影响。
- 不需要具体指定 cuda 版本号,系统已经建立了一个链接 cuda -> cuda-9.0 # vim /etc/profile ... export PATH=/usr/local/cuda/bin:$PATH export LD_LIBRARY_PATH=/usr/local/cuda/lib64:$LD_LIBRARY_PATH # source /etc/profile ; 使环境变量立即生效 1 2 3 4 5
- 首先,测试 cuda, nvcc 命令是否可用 # cuda ; 按两下 tab 键 cudafe cuda-gdb cuda-install-samples-9.0.sh cudafe++ cuda-gdbserver cuda-memcheck # nvcc --version nvcc: NVIDIA (R) Cuda compiler driver Copyright (c) 2005-2017 NVIDIA Corporation Built on Fri_Sep__1_21:08:03_CDT_2017 Cuda compilation tools, release 9.0, V9.0.176 1 2 3 4 5 6 7 8 接下来,用 cuda 例程测试,找到例程的安装目录,默认在 /root 下 # cd /root/NVIDIA_CUDA-9.0_Samples # ll drwxr-xr-x. 50 root root 4096 Nov 18 10:12 0_Simple drwxr-xr-x. 7 root root 120 Nov 18 10:12 1_Utilities drwxr-xr-x. 12 root root 221 Nov 18 10:12 2_Graphics drwxr-xr-x. 22 root root 4096 Nov 18 10:12 3_Imaging drwxr-xr-x. 10 root root 209 Nov 18 10:12 4_Finance drwxr-xr-x. 10 root root 150 Nov 18 10:12 5_Simulations drwxr-xr-x. 34 root root 4096 Nov 18 10:12 6_Advanced drwxr-xr-x. 38 root root 4096 Nov 18 10:12 7_CUDALibraries drwxr-xr-x. 3 root root 20 Nov 18 10:24 bin drwxr-xr-x. 6 root root 71 Nov 18 10:12 common -rw-r--r--. 1 root root 81262 Nov 18 10:12 EULA.txt -rw-r--r--. 1 root root 2652 Nov 18 10:12 Makefile 1 2 3 4 5 6 7 8 9 10 11 12 13 14 只需要挑选其中的几个进行测试即可,比如 # cd 1_Utilities/deviceQuery # make # ./deviceQuery ./deviceQuery Starting... CUDA Device Query (Runtime API) version (CUDART static linking) Detected 1 CUDA Capable device(s) Device 0: "Tesla P4" CUDA Driver Version / Runtime Version 9.0 / 9.0 CUDA Capability Major/Minor version number: 6.1 Total amount of global memory: 7606 MBytes (7975862272 bytes) (20) Multiprocessors, (128) CUDA Cores/MP: 2560 CUDA Cores GPU Max Clock rate: 1114 MHz (1.11 GHz) Memory Clock rate: 3003 Mhz Memory Bus Width: 256-bit ... 1 2 3 4 5 6 7 8 9 10 11 12 13 14 15 16 17 18 如果在 make 编译步骤出现 g++ … error,只需要再升级一下 gcc 即可, yum install gcc . 至此,CUDA Toolkit 已经安装完成。
- 为了方便调试,安装桌面环境。如果系统是最小安装,则需要下载很多组件,建议使用国内的高速源 # yum grouplist ; 确认桌面组件的名称 ... GNOME Desktop ... KDE Plasma Workspaces ... # yum groupinstall "GNOME Desktop" 或 yum groupinstall "KDE Plasma Workspaces" ; 两种桌面任选一种 # systemctl set-default graphical.target # init 5 ; 执行之后,桌面会启动 1 2 3 4 5 6 7 8 9 安装 VNC server 远程桌面 # yum install tigervnc-server # vncserver ; 创建远程桌面 # vncserver -kill :id ; 关闭远程桌面 1 2 3
-
- # systemctl stop firewalld.service # systemctl disable firewalld.service 1 2 对应两句,开启防火墙 # systemctl start firewalld.service # systemctl enable firewalld.service 1 2
- # vim /etc/sysconfig/network-scripts/ifcfg-enp1s0 ;可能为enp2s0 TYPE=Ethernet PROXY_METHOD=none BOOTPROTO=none DEFROUTE=yes IPV4_FAILURE_FATAL=yes ... NAME=enp2s0f0 UUID=0e9f6109-941c-4115-99cf-97e468ea8992 DEVICE=enp2s0f0 ONBOOT=yes IPADDR=10.13.**.*** PREFIX=24 GATEWAY=10.13.**.1 DNS1=10.10.0.** # systemctl restart network 1 2 3 4 5 6 7 8 9 10 11 12 13 14 15 16
- # hostnamectl # hostnamectl --transient set-hostname [newHostName] # hostnamectl --static set-hostname [newHostName] # hostnamectl 1 2 3 4
- Measure Measure
# uname -r
3.10.0-693.el7.x86_64 ; 不同操作系统的内核版本会不一样,最好记住它
# df ; 确认 boot 目录的空间不少于 300 MB
1
2
3
nouveau 是系统自带的一个显示驱动程序,需要先将其禁用,然后再进行下一步操作,否则在安装显卡驱动时,会提示:You appear to be running an X server …,然后安装失败。分别打开如下两个文件(如果没有就创建一个),并在其中输入如下两句,然后保存。
# vim /etc/modprobe.d/nvidia-installer-disable-nouveau.conf
# vim /lib/modprobe.d/nvidia-installer-disable-nouveau.conf
...
blacklist nouveau
options nouveau modeset=0
1
2
3
4
5
或者直接运行 NVIDIA 显卡驱动安装包(*.run),会出现提示:One or more modprobe configuration files to disable Nouveau have been written … 点击 OK 之后,会自动在指定位置创建好禁用 nouveau 驱动的文件,这样就不需要再手动添加。
这一步需要确保 boot 文件目录的空间足够,否则会失败。建议大于 400 MB
# cp /boot/initramfs-$(uname -r).img /boot/initramfs-$(uname -r).img.bak
# dracut /boot/initramfs-$(uname -r).img $(uname -r)
# rm /boot/initramfs-$(uname -r).img.bak ; 这一步可不执行
1
2
3
如果之前在图形界面操作,需要改为终端模式,runlevel 改为 3
# systemctl set-default multi-user.target
# init 3
# reboot
1
2
3
预安装一些必需的组件,需要联网
# yum install gcc kernel-devel kernel-headers
1
NVIDIA 官网的显卡驱动下载,很方便
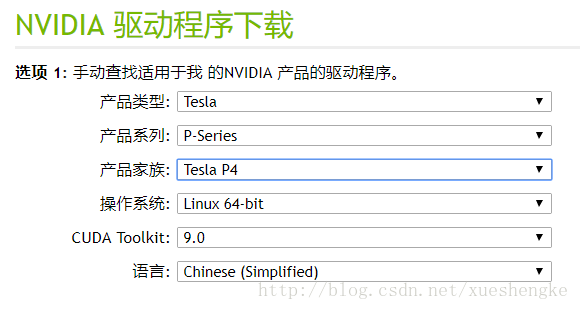
执行如下的安装步骤,必需指定 kernel source path,否则会报错;kernel 的版本和系统内核有关,可能会有差别
# cd /to/your/directory/ ; 跳转到驱动所在的目录
# ./NVIDIA-Linux-x86_64-384.81.run --kernel-source-path=/usr/src/kernels/3.10.0-693.5.2.el7.x86_64 -k $(uname -r)
1
2
执行后,开始解压驱动包,进入安装步骤,可能中间会出现一些警告,但是不影响
Verifying archive integrity... OK
Uncompressing NVIDIA Accelerated Graphics Driver for Linux-x86_64 384.81.......................................
..................................................................
..................................................................
1
2
3
4
许可证 -accept

…

安装 32 位兼容库 -yes
![]()
安装速度很快

安装顺利完成
![]()
执行如下两条语句,如果出现显卡的型号信息,说明驱动已经安装成功。
# lspci |grep NVIDIA
03:00.0 3D controller: NVIDIA Corporation GP104GL [Tesla P4] (rev a1)
# nvidia-smi
Sun Nov 19 10:49:31 2017
+-----------------------------------------------------------------------------+
| NVIDIA-SMI 384.81 Driver Version: 384.81 |
|-------------------------------+----------------------+----------------------+
| GPU Name Persistence-M| Bus-Id Disp.A | Volatile Uncorr. ECC |
| Fan Temp Perf Pwr:Usage/Cap| Memory-Usage | GPU-Util Compute M. |
|===============================+======================+======================|
| 0 Tesla P4 Off | 00000000:03:00.0 Off | 0 |
| N/A 37C P0 23W / 75W | 0MiB / 7606MiB | 0% Default |
+-------------------------------+----------------------+----------------------+
+-----------------------------------------------------------------------------+
| Processes: GPU Memory |
| GPU PID Type Process name Usage |
|=============================================================================|
| No running processes found |
+-----------------------------------------------------------------------------+
1
2
3
4
5
6
7
8
9
10
11
12
13
14
15
16
17
18
19
20
在 NVIDIA 官网下载对应的安装文件,建议选择 *.run 文件,用本地安装的方式
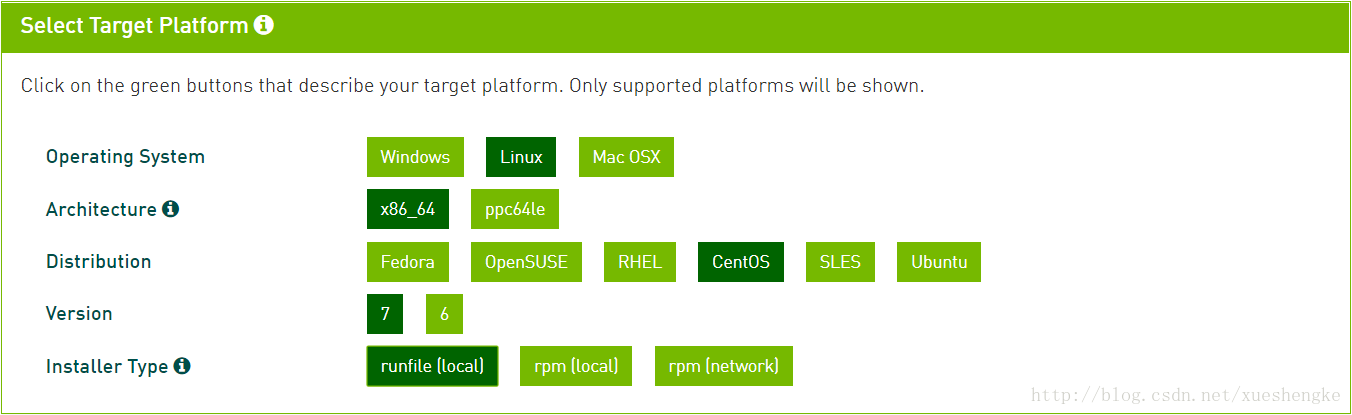
本文使用的是 cuda_9.0.176_384.81_linux.run,接下来进行安装
# ./cuda_9.0.176_384.81_linux.run
...
Install NVIDIA Accelerated Graphics Driver ... -no ; 不需要再安装显卡驱动
Install OpenGL ... -no ; 这个组件一定不要安装,如果出现选择,选 No
Install CUDA 9.0 Toolkit ... -yes
Toolkit location /usr/local/cuda-9.0 ... [Enter] ; 默认安装位置即可
Install a symbolic link at ... -yes
Install CUDA 9.0 Samples ... -yes ; 安装一些例程
Enter CUDA Samples Location ... [Enter] ; 默认安装位置
...
Finished
Driver : Not Selected
Toolkit : Installed in /usr/local/cuda-9.0
Samples : Installed in /root, but missing recommended libraries
***WARNING: Incomplete installation!
1
2
3
4
5
6
7
8
9
10
11
12
13
14
15
出现警告,安装不完全,但是没有影响。
不需要具体指定 cuda 版本号,系统已经建立了一个链接 cuda -> cuda-9.0
# vim /etc/profile
...
export PATH=/usr/local/cuda/bin:$PATH
export LD_LIBRARY_PATH=/usr/local/cuda/lib64:$LD_LIBRARY_PATH
# source /etc/profile ; 使环境变量立即生效
1
2
3
4
5
首先,测试 cuda, nvcc 命令是否可用
# cuda ; 按两下 tab 键
cudafe cuda-gdb cuda-install-samples-9.0.sh
cudafe++ cuda-gdbserver cuda-memcheck
# nvcc --version
nvcc: NVIDIA (R) Cuda compiler driver
Copyright (c) 2005-2017 NVIDIA Corporation
Built on Fri_Sep__1_21:08:03_CDT_2017
Cuda compilation tools, release 9.0, V9.0.176
1
2
3
4
5
6
7
8
接下来,用 cuda 例程测试,找到例程的安装目录,默认在 /root 下
# cd /root/NVIDIA_CUDA-9.0_Samples
# ll
drwxr-xr-x. 50 root root 4096 Nov 18 10:12 0_Simple
drwxr-xr-x. 7 root root 120 Nov 18 10:12 1_Utilities
drwxr-xr-x. 12 root root 221 Nov 18 10:12 2_Graphics
drwxr-xr-x. 22 root root 4096 Nov 18 10:12 3_Imaging
drwxr-xr-x. 10 root root 209 Nov 18 10:12 4_Finance
drwxr-xr-x. 10 root root 150 Nov 18 10:12 5_Simulations
drwxr-xr-x. 34 root root 4096 Nov 18 10:12 6_Advanced
drwxr-xr-x. 38 root root 4096 Nov 18 10:12 7_CUDALibraries
drwxr-xr-x. 3 root root 20 Nov 18 10:24 bin
drwxr-xr-x. 6 root root 71 Nov 18 10:12 common
-rw-r--r--. 1 root root 81262 Nov 18 10:12 EULA.txt
-rw-r--r--. 1 root root 2652 Nov 18 10:12 Makefile
1
2
3
4
5
6
7
8
9
10
11
12
13
14
只需要挑选其中的几个进行测试即可,比如
# cd 1_Utilities/deviceQuery
# make
# ./deviceQuery
./deviceQuery Starting...
CUDA Device Query (Runtime API) version (CUDART static linking)
Detected 1 CUDA Capable device(s)
Device 0: "Tesla P4"
CUDA Driver Version / Runtime Version 9.0 / 9.0
CUDA Capability Major/Minor version number: 6.1
Total amount of global memory: 7606 MBytes (7975862272 bytes)
(20) Multiprocessors, (128) CUDA Cores/MP: 2560 CUDA Cores
GPU Max Clock rate: 1114 MHz (1.11 GHz)
Memory Clock rate: 3003 Mhz
Memory Bus Width: 256-bit
...
1
2
3
4
5
6
7
8
9
10
11
12
13
14
15
16
17
18
如果在 make 编译步骤出现 g++ … error,只需要再升级一下 gcc 即可, yum install gcc .
至此,CUDA Toolkit 已经安装完成。
为了方便调试,安装桌面环境。如果系统是最小安装,则需要下载很多组件,建议使用国内的高速源
# yum grouplist ; 确认桌面组件的名称
...
GNOME Desktop
...
KDE Plasma Workspaces
...
# yum groupinstall "GNOME Desktop" 或 yum groupinstall "KDE Plasma Workspaces" ; 两种桌面任选一种
# systemctl set-default graphical.target
# init 5 ; 执行之后,桌面会启动
1
2
3
4
5
6
7
8
9
安装 VNC server 远程桌面
# yum install tigervnc-server
# vncserver ; 创建远程桌面
# vncserver -kill :id ; 关闭远程桌面
1
2
3
# systemctl stop firewalld.service
# systemctl disable firewalld.service
1
2
对应两句,开启防火墙
# systemctl start firewalld.service
# systemctl enable firewalld.service
1
2
# vim /etc/sysconfig/network-scripts/ifcfg-enp1s0 ;可能为enp2s0
TYPE=Ethernet
PROXY_METHOD=none
BOOTPROTO=none
DEFROUTE=yes
IPV4_FAILURE_FATAL=yes
...
NAME=enp2s0f0
UUID=0e9f6109-941c-4115-99cf-97e468ea8992
DEVICE=enp2s0f0
ONBOOT=yes
IPADDR=10.13.**.***
PREFIX=24
GATEWAY=10.13.**.1
DNS1=10.10.0.**
# systemctl restart network
1
2
3
4
5
6
7
8
9
10
11
12
13
14
15
16
# hostnamectl
# hostnamectl --transient set-hostname [newHostName]
# hostnamectl --static set-hostname [newHostName]
# hostnamectl
1
2
3
4
Measure
Measure


暂无评论
要发表评论,您必须先 登录